Product Overview
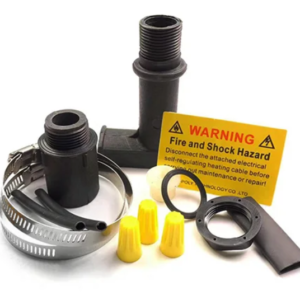
The Power Connection Kit (DPRK) provides a watertight entry into a junction box and includes cable seals for power and end terminations. It is designed for use with AFA-RGS heating cables and is ideal when you need a reliable junction-box connection point for field installations.
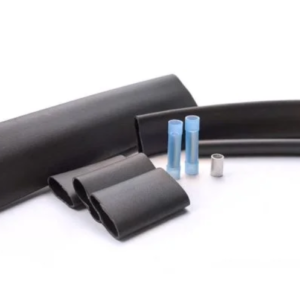
This kit includes core connection and sealing components along with adhesive-lined heat shrink insulation for the bus wires, including Ø3 (3inch/75mm) tubes (Qty 2) and a Ø12 (2inch/50mm) tube (Qty 1).
Rated for systems up to 240V and 30A, with a maximum continuous exposure temperature of 85°C (connection point temperature may exceed 60°C).
Additional material recommended: a junction box not less than 4”×4”×3” NEMA 4X with a clearance hole for 3/4-inch conduit or a 3/4-inch NPT threaded hub (UL & CSA Listed for the application).
Product Sheets
Key Benefits
- Watertight junction box entry—designed to provide a secure, sealed cable entry into an enclosure.
- Power + end termination sealing—includes cable seals and adhesive-lined heat shrink for dependable insulation and sealing at the connection point.
- Complete kit for field installation—includes core connector/sealing components and required heat shrink tubing for bus wire insulation.
Specifications
-
Rated voltage: 240V
-
Max permissible steady-state current: 30A
-
Max continuous exposure temperature: 85°C
-
Note: connection point temperature may exceed 60°C
-
Heat shrink tubes included: Ø3 (3inch/75mm) Qty 2 and Ø12 (2inch/50mm) Qty 1
Installation Summary
-
Prepare the cable: cut the outer jacket 5.5in (140mm) from the top and remove the outer jacket.
-
Unbraid the screen using a screwdriver/tapered tool (do not break the braid). Disperse into two strands, align, twist, then twist into one.
-
Cut and remove the inner insulation 4in (100mm) from the top. Peel back the bus wires and remove remaining core material.
-
Slide the retaining cap and grommet onto the cable as shown.
-
Insulate bus wires: insert each bus wire into a Ø3 (3inch/75mm) heat shrink tube and heat evenly side-to-side.
- Apply the outer seal: shave the black core material from each bus wire, slide the Ø12 (2inch/50mm) heat shrink tube into position, heat until glue comes out from both ends, then pinch between the wires and hold at least 10 seconds with pliers.
- Assemble to the enclosure: tighten the retaining cap to the connector body, insert the connector body into the junction box and secure with the conduit locknut. Apply the warning label, then connect the heating cable and power supply using the included wire nuts.